Ueberschalter: Unterschied zwischen den Versionen
Aus C3MAWiki
Weitere Optionen
Ollo (Diskussion | Beiträge) |
Ollo (Diskussion | Beiträge) |
||
| (32 dazwischenliegende Versionen von 3 Benutzern werden nicht angezeigt) | |||
| Zeile 1: | Zeile 1: | ||
{{aktives Projekt|Kontakt=Ollo}} | {{aktives Projekt|Kontakt=Ollo}} | ||
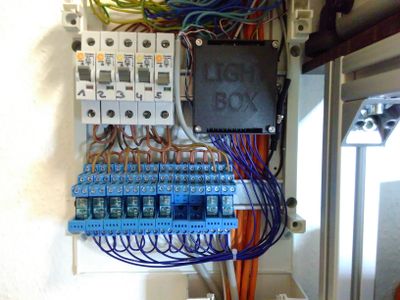
= | [[Datei:SchaltschrankUeberschalterV2.jpg|400px|right|Schaltschrank Ueberschalter V2.0]] | ||
= Publikationen = | |||
Projekt auf '''Github''' [https://github.com/C3MA/uberschalter Projekt auf Github] | |||
Präsentation beim C3MA: [[Datei:2014-02-28_Praesi_Raumbeleuchtung.pdf]] | |||
= Server = | = Server = | ||
== Hardware == | == Hardware == | ||
* Raspberry | * Ethernet | ||
* RS485 USB-Dongle | |||
Die Kommunikation zum Raspberry erfolgt über Ethernet, es werden keine weiteren Schnittstellen benötigt. | |||
== Software == | |||
* raspbian (wheezy) | |||
** python | |||
** lighttpd (optional für Webclient) | |||
*** Webserver-Projekt [https://github.com/C3MA/uberschalter Unterordner web] | |||
== Webserver konfigurieren == | |||
<pre> | |||
$ cd /var/ | |||
$ sudo chown pi:pi www/ | |||
$ cd cd /var/www/ | |||
$ git clone https://github.com/C3MA/uberschalter | |||
$ cd uberschalter/web/ | |||
$ make | |||
</pre> | |||
Aktualiseren der '''lighttpd''' Konfiguration zu folgender (Muss ggf. erst installiert werden): | |||
<pre> | |||
server.modules = ( | |||
"mod_cgi", | |||
"mod_access", | |||
"mod_alias", | |||
"mod_compress", | |||
"mod_redirect", | |||
# "mod_rewrite", | |||
) | |||
#server.document-root = "/var/www" | |||
server.document-root = "/var/www/uberschalter/web/www" | |||
server.upload-dirs = ( "/var/cache/lighttpd/uploads" ) | |||
server.errorlog = "/var/log/lighttpd/error.log" | |||
server.pid-file = "/var/run/lighttpd.pid" | |||
server.username = "www-data" | |||
server.groupname = "www-data" | |||
server.port = 80 | |||
index-file.names = ( "index.php", "index.html", "index.lighttpd.html" ) | |||
url.access-deny = ( "~", ".inc" ) | |||
static-file.exclude-extensions = ( ".php", ".pl", ".fcgi" ) | |||
== | compress.cache-dir = "/var/cache/lighttpd/compress/" | ||
compress.filetype = ( "application/javascript", "text/css", "text/html", "text/plain" ) | |||
# default listening port for IPv6 falls back to the IPv4 port | |||
include_shell "/usr/share/lighttpd/use-ipv6.pl " + server.port | |||
include_shell "/usr/share/lighttpd/create-mime.assign.pl" | |||
include_shell "/usr/share/lighttpd/include-conf-enabled.pl" | |||
$HTTP["url"] =~ "/cgi-bin/" { | |||
cgi.assign = ( "" => "" ) | |||
} | |||
cgi.assign = ( | |||
".cgi" => "" | |||
) | |||
</pre> | |||
= Client = | = Client = | ||
== Android == | == Android == | ||
* https://bitbucket.org/0110/iorouter | * https://bitbucket.org/0110/iorouter | ||
* https://github.com/C3MA/and-MqttLight | |||
** [[Datei:MqttLight.zip]] | |||
= Lampenpositionen = | |||
<gallery> | |||
Datei:LampenPlan.jpg|Lampenpositionen mit deren Identifikationsnummer | |||
</gallery> | |||
Update der Lampenpositionen notwendig (wenn alle Lampen einzeln angesprochen werden können) | |||
= Mqtt = | |||
== Doku == | |||
Folgende Stati werden in MQTT geschickt: | |||
<pre> | |||
/room/light/3/command off | |||
/room/light/1/state on | |||
/room/light/2/state on | |||
/room/light/3/state off | |||
/room/light/4/state on | |||
/room/light/5/state on | |||
/room/light/6/state on | |||
/room/light/7/state on | |||
/room/light/8/state on | |||
/room/light/3/command off | |||
/room/light/3/command off | |||
/room/light/3/command on | |||
/room/light/3/state on | |||
</pre> | |||
Linux Befehl: | |||
$ mosquitto_sub -v -h 10.23.42.10 -t "/room/light/#" | |||
Eine Lampe kann mit folgenden Schema geschalten werden: '''/room/light/<id>/command (on|off)'''. | |||
Unter Linux wurde das wie folgt getestet: | |||
<pre> | |||
$ mosquitto_pub -h 10.23.42.10 -t "/room/light/3/command" -m "off" | |||
$ mosquitto_pub -h 10.23.42.10 -t "/room/light/3/command" -m "on" | |||
</pre> | |||
Und hier das Sammel-Topic für die Werkstatt: | |||
<pre> | |||
$ mosquitto_pub -h 10.23.42.10 -t "/room/light/w/command" -m "off" | |||
$ mosquitto_pub -h 10.23.42.10 -t "/room/light/w/command" -m "on" | |||
</pre> | |||
Aktuelle Version vom 27. Januar 2019, 19:20 Uhr
Dies ist ein Projekt, an dem momentan aktiv gearbeitet wird. Wenn du Fragen hast oder mitarbeiten möchtest, wende dich an Ollo.

Publikationen
Projekt auf Github Projekt auf Github
Präsentation beim C3MA: Datei:2014-02-28 Praesi Raumbeleuchtung.pdf
Server
Hardware
- Ethernet
- RS485 USB-Dongle
Die Kommunikation zum Raspberry erfolgt über Ethernet, es werden keine weiteren Schnittstellen benötigt.
Software
- raspbian (wheezy)
- python
- lighttpd (optional für Webclient)
- Webserver-Projekt Unterordner web
Webserver konfigurieren
$ cd /var/
$ sudo chown pi:pi www/
$ cd cd /var/www/
$ git clone https://github.com/C3MA/uberschalter
$ cd uberschalter/web/
$ make
Aktualiseren der lighttpd Konfiguration zu folgender (Muss ggf. erst installiert werden):
server.modules = (
	"mod_cgi",
	"mod_access",
	"mod_alias",
	"mod_compress",
 	"mod_redirect",
#       "mod_rewrite",
)

#server.document-root        = "/var/www"
server.document-root        = "/var/www/uberschalter/web/www"
server.upload-dirs          = ( "/var/cache/lighttpd/uploads" )
server.errorlog             = "/var/log/lighttpd/error.log"
server.pid-file             = "/var/run/lighttpd.pid"
server.username             = "www-data"
server.groupname            = "www-data"
server.port                 = 80


index-file.names            = ( "index.php", "index.html", "index.lighttpd.html" )
url.access-deny             = ( "~", ".inc" )
static-file.exclude-extensions = ( ".php", ".pl", ".fcgi" )

compress.cache-dir          = "/var/cache/lighttpd/compress/"
compress.filetype           = ( "application/javascript", "text/css", "text/html", "text/plain" )

# default listening port for IPv6 falls back to the IPv4 port
include_shell "/usr/share/lighttpd/use-ipv6.pl " + server.port
include_shell "/usr/share/lighttpd/create-mime.assign.pl"
include_shell "/usr/share/lighttpd/include-conf-enabled.pl"

$HTTP["url"] =~ "/cgi-bin/" {
        cgi.assign = ( "" => "" )
}

cgi.assign      = (
        ".cgi"  => ""
)
Client
Android
Lampenpositionen
-
Lampenpositionen mit deren Identifikationsnummer
Update der Lampenpositionen notwendig (wenn alle Lampen einzeln angesprochen werden können)
Mqtt
Doku
Folgende Stati werden in MQTT geschickt:
/room/light/3/command off
/room/light/1/state on
/room/light/2/state on
/room/light/3/state off
/room/light/4/state on
/room/light/5/state on
/room/light/6/state on
/room/light/7/state on
/room/light/8/state on
/room/light/3/command off
/room/light/3/command off
/room/light/3/command on
/room/light/3/state on
Linux Befehl:
$ mosquitto_sub -v -h 10.23.42.10 -t "/room/light/#"
Eine Lampe kann mit folgenden Schema geschalten werden: /room/light/<id>/command (on|off).
Unter Linux wurde das wie folgt getestet:
$ mosquitto_pub -h 10.23.42.10 -t "/room/light/3/command" -m "off"
$ mosquitto_pub -h 10.23.42.10 -t "/room/light/3/command" -m "on"
Und hier das Sammel-Topic für die Werkstatt:
$ mosquitto_pub -h 10.23.42.10 -t "/room/light/w/command" -m "off"
$ mosquitto_pub -h 10.23.42.10 -t "/room/light/w/command" -m "on"

